Documentation
Setting up and using the real estate app – from import to website widgets, portal exports and MLS to property valuation.
Quick start
The most important steps from installation to the published website.
After installation, the app sets up the required CRM objects and associations for the account. When you first open it, you choose your market, language and real estate software; the app creates standard widgets and offers sample properties so you can try widgets and exposés right away. Then configure the import, the website settings and your website widgets.
- 1Open Settings and check your OpenImmo access details.
- 2In “Website settings”, enter the published domain and the reCAPTCHA keys.
- 3Store the SFTP access details in your broker software and start an OpenImmo export.
- 4Check the imported portfolio under “Properties”.
- 5Create your widgets under “Website widgets” and embed them via HTML code, the WordPress plugin or the AI Studio prompt.
OpenImmo and SFTP
Import properties, images and documents automatically.
The app provides a separate SFTP access per account. Transfer complete OpenImmo packages from your broker software into the incoming folder shown.
- Property data is adopted automatically
- Images are assigned to the correct property
- PDF documents keep their transmitted title
- Media no longer delivered are deactivated
Change password
Administrators can show or regenerate the SFTP password in the settings. After a change, the new password must also be stored in the sending broker software.
Documents on the website
Documents are released for the website by default. In the separate “Documents” box you can disable public display for the whole account. Titles such as “Exposé” or “Energy certificate” are taken from the transfer.
Website settings
Set the domain and security check for your website.
- 1Enter the domain on which the widgets are published.
- 2Enter the reCAPTCHA site key and the corresponding secret key.
- 3Save the settings. A new domain is first created as a pending verification.
- 4Choose WordPress or “AI Studio / other website” and store the one-time code shown.
- 5WordPress is linked on the server side via the connection code. For the AI Studio, a ready-made prompt for inserting the meta tag is available.
- 6Publish the website and then click “Check domain now”.
Website widgets
Build property, valuation and MLS search widgets and embed them on your website.
Under “Property widgets” you can create any number of widgets: properties (your listings), landing page, valuation (owner requests), search request and – with MLS access – MLS search. For each widget you choose the view, filters, language and colours (primary colour; secondary colour for the price). Under “Embed codes” you copy the right code for HTML websites, WordPress or the AI studio. Changes to a widget take effect on all pages immediately, without pasting the code again. The preview works even before a website is entered. Sample properties appear in the widgets and on your website until you remove them with one click under “Properties”.
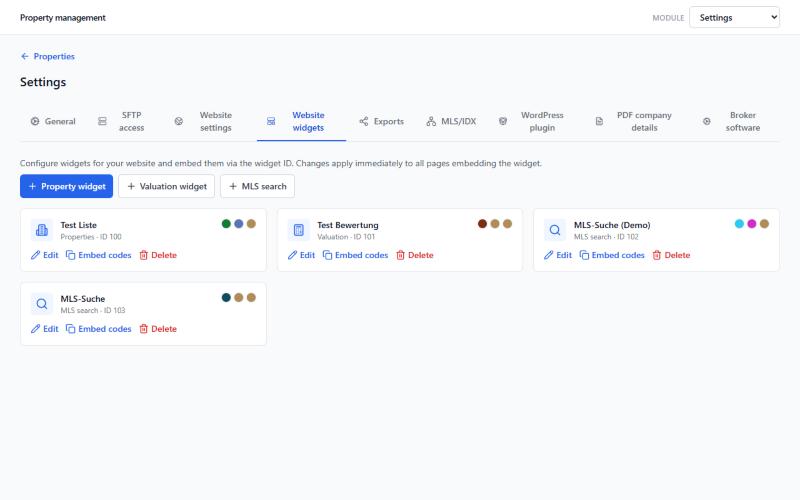
- Gallery, list, table and carousel views
- Map view with list and price pins
- Detail page under /immobilie/:slug
- Labels in the visitor's language
Property landing page
For ads and funnels there is the “Property landing page” widget: you choose a property and the page shows it with a large title image, price, key facts, pictures, description, map and inquiry form; an “Enquire now” button stays visible while scrolling. If the property is sold, let or no longer on offer, a notice with a link to other properties appears (configurable in the widget). It is embedded like any widget via embed code – on the website, a subdomain or in WordPress.
Search requests
The CRM has a “Search requests” object: buy or rent, property type, cities or ZIP codes, price, rooms and living area, linked to the prospect's contact. Create search requests yourself in the CRM or let prospects create them with the “Search request form” widget on your website. When a property becomes active or its price drops, the app automatically checks it against all active search requests and starts the “Property match” workflow trigger for every match – e.g. for an email with the new listing. Each search request gets at most five matches per day; the number of matches and the date of the last one are stored in the search request. Status “Paused” or “Closed” stops the matching.
Radius: a search request can have a centre (city or ZIP code) with a radius in km – in the website form via place search and slider. Under “Search requests” (module switcher or CRM menu) you see all search requests with contact, criteria and matches and can edit them, e.g. when a prospect calls. With “Add search request” you create a search request directly in the app – for an existing or a new contact. Changes are saved directly in the CRM.
Map view
Show properties as a list and on a map.
With the “Map with list” view, a property or MLS widget shows the properties as cards on the left and a map with price pins on the right. Clicking a pin scrolls the list to the property; clicking a card opens the detail view as a side panel. After closing it, the map stays as it was.
- Location is determined automatically from the address
- If the address is not released, the pin only shows the approximate location (postcode/town)
- Properties close to each other are grouped
- On smartphones, list and map are stacked
Connecting an AI website to your own domain
Publish a website from the AI Studio with your own domain – automatically with many domain providers.
With many domain providers you can connect a website created in the AI Studio to your existing domain automatically – no manual DNS records needed. Log in to your domain provider in a second browser tab beforehand and keep it open.
- 1Open your domain provider account in a second browser tab and keep it open during the setup.
- 2Open the AI Studio and select the website you want to connect.
- 3Click “Publish” at the top right.
- 4Enter your domain without “www”, “http://” or “https://”.
- 5Check whether the “Authorise domain” button is shown – if so, your provider supports the automatic connection.
- 6Click “Authorise domain”.
- 7In your provider's window that opens, log in and click “Connect”.
- 8Wait until the connection has been set up. This can take a few minutes.
- 9Your AI website is then connected to your own domain.
WordPress plugin
Insert widgets from the CRM into WordPress via embed code and set up the detail page.
The property plugin connects your WordPress website to the CRM. You create and design all widgets (properties, valuation, MLS search) in the CRM under “Website widgets” and insert them on the desired page using the WordPress code. The widget scripts are only loaded on pages that contain a widget.
- Insert widgets from the CRM via embed code
- Changes to the widget in the CRM apply immediately on all pages
- Gallery, list, table, carousel and map
- Own detail page with readable property addresses; plugin interface in six languages
Install plugin
- 1Download the current plugin ZIP under “Settings → WordPress plugin”.
- 2In the WordPress back end, open “Plugins → Add New → Upload Plugin”.
- 3Select the downloaded ZIP file and activate the property plugin.
- 4Open the settings of the property plugin.
- 5Create a page for the property details (or let the plugin create the property pages automatically) and select it as the “Property detail page”.
- 6Copy the WordPress connection code from the website settings into the plugin field.
- 7Click “Connect WordPress” in the plugin. The domain is confirmed automatically on the server side.
- 8Switch back to the website settings and refresh the connection status.
- 9Create a widget in the CRM under “Website widgets”, copy the WordPress code from the embed codes and paste it on the desired WordPress page.
Shortcode for the detail page
The only shortcode you add yourself goes on the property detail page: the same widget ID as your property widget, plus ansicht="detail". You will also find the ready-made code in the widget's embed codes.
Detail page
The property links use addresses such as/immobilie/objekt-slug. If WordPress initially shows a 404 error after installing the plugin, open “Settings → Permalinks” and save the existing setting once again.
Sending property enquiries to Propstack
Transfer website enquiries automatically by email to Propstack and create them there as contacts.
The app can send property and valuation enquiries from your website in the format supported by Propstack to the recipient address stored in Propstack. An additional Propstack API key is not required for this.
- 1Open Propstack and copy the email address stored there for website or portal enquiries.
- 2In your CRM, open “Properties → Settings → Broker software”.
- 3Switch to the “Propstack” tab.
- 4Enter the copied Propstack email address in the fields for property enquiries and valuation requests.
- 5Enable the desired sending options.
- 6Click “Save”.
- 7A contact named “Propstack Schnittstelle” is created automatically in the CRM.
- 8In Propstack, open “Verwalten → Automatisierung” (Manage → Automation).
- 9Enable the automation “100 Portalanfragen legen automatisch Kontakte an” (portal enquiries create contacts automatically).
- Property enquiries are assigned to the requested property via the internal OpenImmo property number.
- Valuation requests are transferred to Propstack as owner enquiries.
- Activating the Propstack automation is required so that contacts are created automatically from incoming portal enquiries.
- Property and valuation enquiries can be enabled or disabled independently of each other.
Integrate valuation widget
Capture owner enquiries in a structured way via the website.
The AI studio prompt of a valuation widget (“Property widgets”) adds the valuation widget to your website. Prospects enter property, address and contact details and confirm the security check before sending. In the widget you choose one of three versions: Classic (step by step), Visual (illustrations with a growing summary) or Assistant (conversational).
After a successful transfer, a contact and a valuation object are created in the CRM. The association and the location analysis with map and infrastructure are triggered automatically.
Properties and enquiries
Check imported properties and find related contacts.
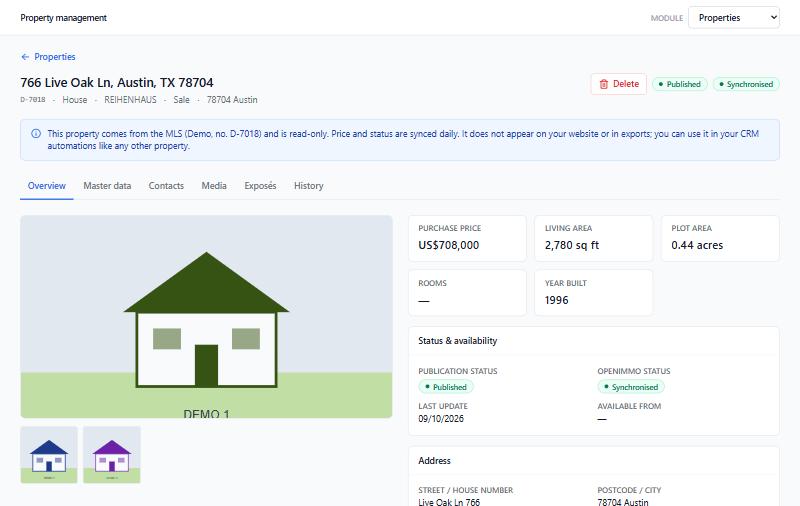
The property overview shows the portfolio adopted from OpenImmo and the import status. On the detail page you will find master data, media, history and the contacts linked to the property.
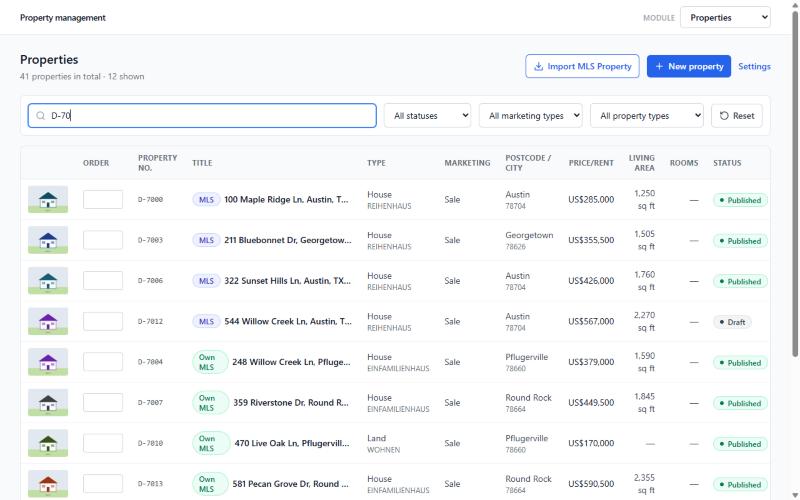
When an enquiry form is submitted on a property detail page, the app links the contact to the correct property. In the “Contacts” tab you can search by name or filter by the first letter of the last name using the letter bar.
Parties and roles
Manage owners, property managers, tenants and other parties of a property.
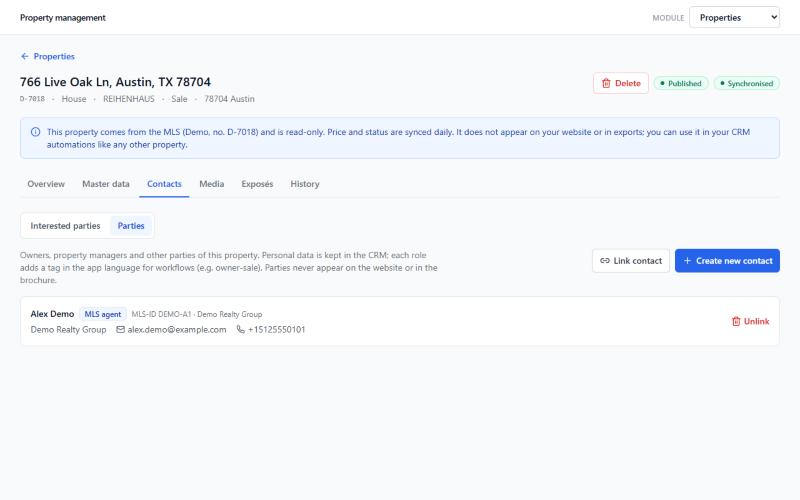
On a property's detail page, assign contacts with a role in the “Parties” section: owner, property manager, tenant or other. A contact can have several roles. Parties from OpenImmo imports are added automatically.
Brochures
Create a PDF brochure of a property.
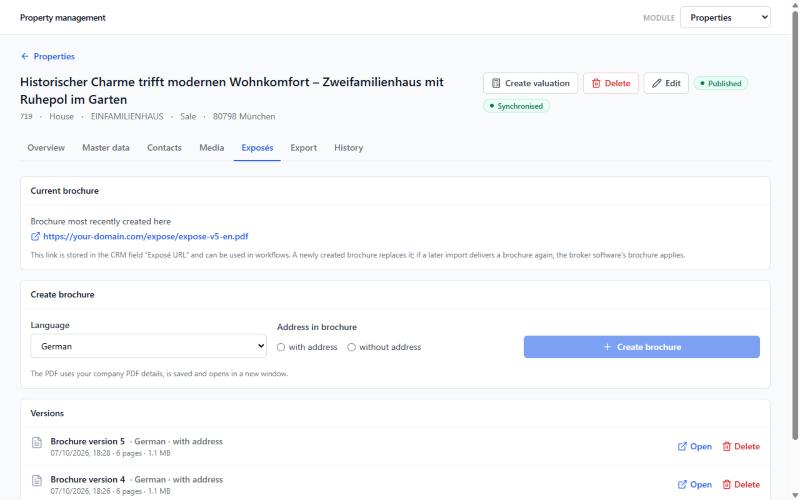
In a property’s “Exposé” tab you create a PDF exposé with one click, including images, property data, description, energy details and your company details. You choose one of three designs: Classic (clear and compact), Elegant (serif typeface, generous white space) or Magazine (full-page title image, chapters, two-column text). If the texts exist in several languages, you choose the language of the exposé.
Exports to portals
Transfer properties automatically to Kyero and OpenImmo portals.
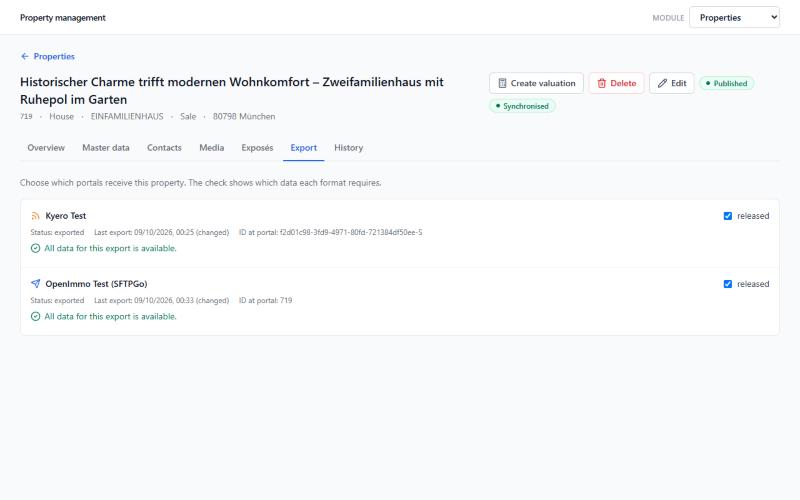
Under “Settings → Exports” you create export targets: a Kyero feed (a fixed address that Kyero fetches regularly) or an OpenImmo portal via FTP/SFTP with the portal's credentials. Which property goes where is set in the “Export” tab of each property.
- 1Create and save an export target (for OpenImmo with the portal's server, user and password).
- 2For Kyero, enter the displayed feed address in your Kyero account.
- 3Release the target in the property's “Export” tab. The check shows whether all required details of the format are present.
- 4The OpenImmo export runs automatically every hour and only transfers changes; a change reaches the portal within about an hour at the latest, and the portal then processes it itself. Transfer urgent changes (e.g. a sale) at the export target with “Run now”. You can see the status and log of every run at the export target.
- Only new, changed and deleted properties are transferred (OpenImmo)
- Sold and rented properties are removed automatically
- Every file is validated against the official format before transfer
- Protection against accidental mass deletion in the Kyero feed
MLS/IDX
Show your MLS listings (USA/Canada) on your website.
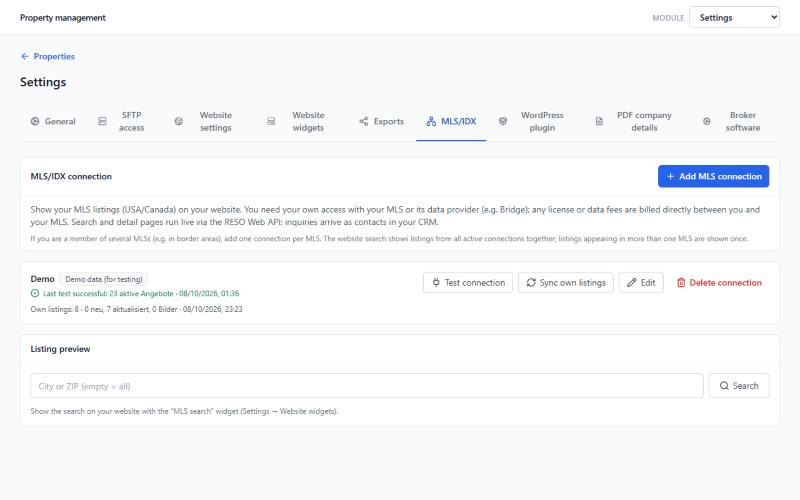
Under “Settings → MLS/IDX” you connect your MLS via the RESO Web API, e.g. through Bridge. You need your own access with the MLS or its data provider; any licence or data fees are settled directly with your MLS. If you are a member of several MLSs, add one connection per MLS.
- 1Add a connection, choose the provider and enter the server token and dataset.
- 2Check with “Test connection” and view the listing preview.
- 3Create a widget of type “MLS search” under “Website widgets” and embed it.
- Search and detail pages run live via the MLS
- Listings from several MLSs appear together, duplicates only once
- Enquiries arrive as contacts in your CRM
- Same views as the property widget, including map with list
Importing MLS listings as properties
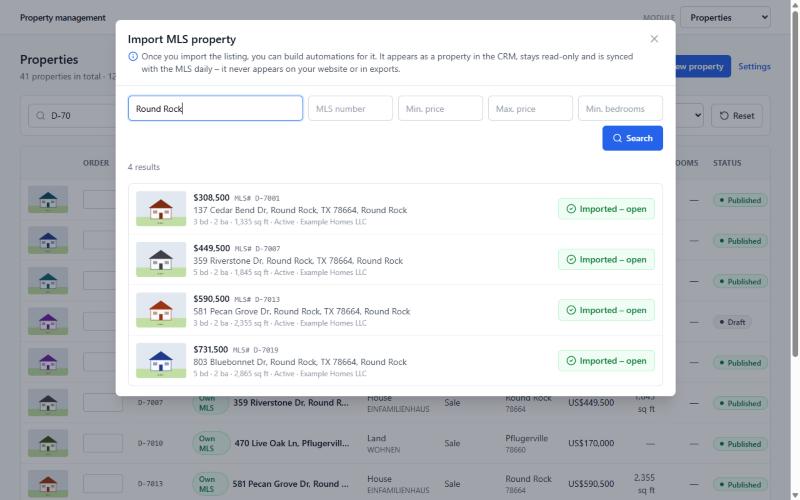
Under “Properties → Import MLS Property” you search the MLS by city, ZIP, MLS number, price or bedrooms and take over a listing with “Import”. You can then link it to contacts and use it in automations.
- Your own listings: enter your agent or office ID under “Settings → MLS/IDX”. Your listings are imported every 6 hours as full properties – editable, on your website, with exposé and exports.
- Other agents' listings stay read-only, are synced with the MLS daily and never appear on your website or in exports.
- Photos are displayed directly from the MLS and not copied; floor plans and documents from the MLS are in the “Media” tab.
- The listing agent is created as a contact and linked in the “Contacts” tab as a party with the role “MLS agent”.
- You can also create an exposé for other agents' listings; obtain the listing agent's consent first. The exposé names the listing agent, the MLS number and the MLS attribution.
- Deleted by mistake? Import the listing again: your own listings come back as your own property, other agents' listings as MLS properties.
Workflow actions
Property search, MLS import, market report and open houses as steps in your CRM workflows.
With the app installed, four additional actions are available in your CRM's workflow builder. They work with your own properties and – with the MLS/IDX module – with your MLS. Each action provides variables for the following steps (e.g. a ready-made list of matches for email or SMS) and branches by result.
- 1In the CRM, open “Automation → Workflows” and create a workflow or open an existing one.
- 2Add an action and search for its name, e.g. “Property search”.
- 3Fill in the fields. Instead of fixed values you can insert contact fields, e.g. {{contact.city}}; numbers such as “$350,000” are recognised automatically.
- 4Create the paths (e.g. “Found” and “Nothing found”) and select the matching result for each path. In the following steps, insert the action's variables via the variable picker.

Property search
Finds matching listings by city or ZIP, marketing type, price, rooms, property type and listing age – in your own properties and optionally also live in the MLS. Result: count, list of matches as text and HTML, plus title, price, city, link and image of the first three matches. Links lead to the detail page on your website.
Import MLS listing
Imports an MLS listing into your CRM as a property using its MLS number and, if desired, links the workflow's contact as a prospect. The listing agent is created as a contact with the role “MLS agent”. Result: title, price, city, status, image and whether the property was newly created.
Market report
Analyses MLS sales of the last 12 months for a ZIP code or city: median sale price, price per sq ft, days on market and – if a living area is given – an estimate with range plus the three closest comparable sales. Available for the USA and Canada.
Open houses
Lists upcoming open houses of active MLS listings by city, maximum price and bedrooms for the next 1–30 days, sorted by date.
Examples
- Saved search: daily or on a tag “saved-search” → Property search with the contact's city and budget, “Only new within days” = 1 → path “Found” → email with the list of matches (Summary HTML).
- Inquiry about an MLS number: form → Import MLS listing with the form field → path “Imported” → task for the agent and confirmation to the prospect with title and price.
- Seller lead in the USA or Canada: form with ZIP code and living area → Market report → email with market report and estimate.
Valuations and PDF documents
Edit valuations, retrieve reference values and create customer documents.
A valuation can be created manually in the CRM module or via the public widget. The detail page combines property details, contact person, location profile, images and provider values.
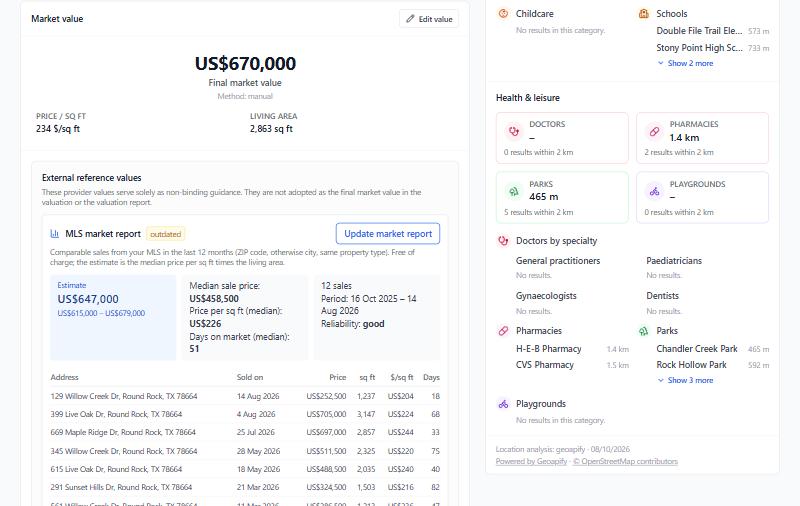
- Request a PriceHubble reference value specifically
- Set the final market value manually
- Maintain two individual notice boxes
- Generate a branded valuation PDF
You maintain general company details, logo and default texts under “Settings → PDF company details”. The default notes are adopted when a new valuation is created and can be changed or removed individually there.
Reference value: PriceHubble or MLS market report
Which reference value is offered depends on the property's country: in Europe PriceHubble is available, in the USA and Canada the MLS market report based on comparable sales of the last 12 months (MLS/IDX module). If the property's country has not been determined yet, the market from “Settings → General” applies.
Linking and deleting properties and valuations
Create a valuation from a property and delete properties and valuations.
Valuation from a property
On the detail page of one of your own properties, “Create valuation” opens the valuation form, prefilled with address, property type, areas, rooms and year built. After saving, the property shows “Go to valuation” instead. If the valuation is deleted, “Create valuation” is available again.
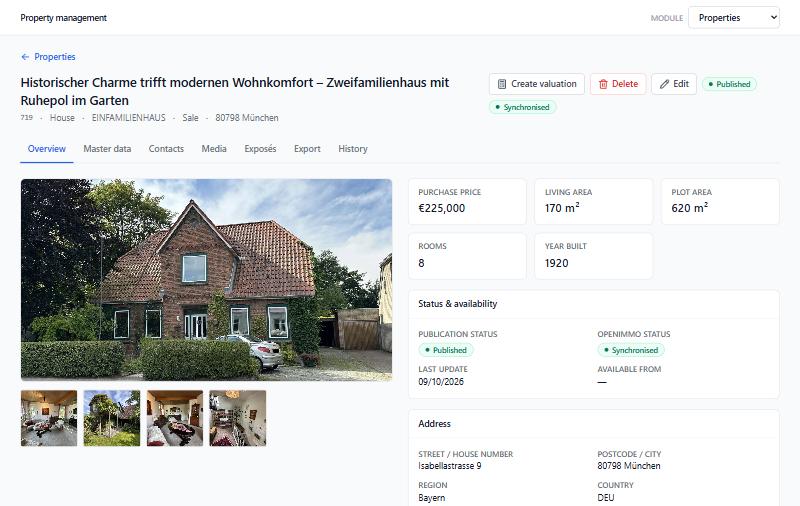
Deleting
- Delete a property: it is deleted in the CRM and archived in Work247; it no longer appears on the website or in exports.
- If the property comes from an import and is still active in your broker software, the next import will create it again. So delete or deactivate it in your broker software first.
- Delete a valuation: the CRM record as well as PDFs, photos, location analysis and estimates are deleted permanently.
Market, areas and currencies
How m², sq ft, acres and currencies are shown per market and property.
Under “Settings → General”, administrators set the country or market. It determines the import paths, the defaults for new properties and the area unit and currency in the CRM and in valuations.
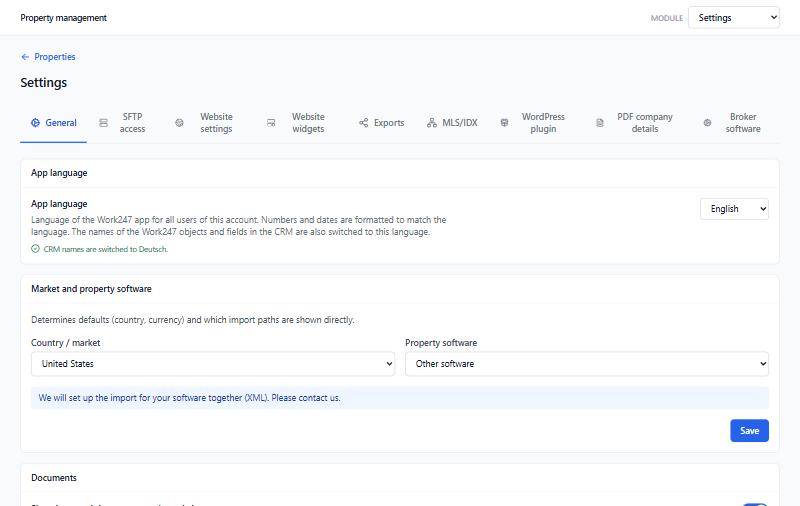
- Each property keeps its own unit and currency – e.g. an MLS listing in sq ft and US dollars, an OpenImmo property in m² and euros
- The area fields in the CRM carry the market's unit (USA and Canada “sq ft” and “acres”, otherwise “m²”); values are converted automatically on transfer
- Valuations – in the app, in the PDF and on the website – use the market's unit and currency
- New properties take country, currency and area unit from the market
Languages
App language, import text language and multilingual property texts.
The app is available in German, English, French, Spanish, Italian and Portuguese. Administrators set the app language under “Settings → General”; it applies to all users of the account.
- Names of CRM objects, fields and tags follow the app language
- Numbers and dates in the format of the chosen language
- Maintain property texts in several languages
- Widgets show the texts in the visitor's language
You choose the language of this documentation at the top right – independently of the app language. For prospects without an installation, you can link the documentation directly in one language, e.g. with “?lang=en” at the end of the address.
Plan and price queries
What your plan includes and how price queries are charged.
All app features are available in every plan. The plans only differ in the number of properties that may be active at the same time. How many properties your plan allows and how many are active is shown at the top of the property list. Once the limit is reached, the oldest properties stay active; further ones are greyed out and not shown on the website or in exports. Your agency handles plan, prices and billing.
Market value queries via PriceHubble may be chargeable and are then billed via the wallet of your CRM account. Before every chargeable query, the system checks whether there is enough balance. Your agency can tell you the terms.
Troubleshooting
Check common causes yourself quickly.
No properties visible
Check the confirmed website domain, the publication status and the last OpenImmo import.
WordPress detail page shows 404
Open the settings of the property plugin, check the selected detail page and then save again under “Settings → Permalinks”.
Import remains unchanged
Check SFTP access, incoming folder and whether your broker software has transferred a current OpenImmo package.
Widget does not load
Check that the widget script is only embedded once and that the published domain is saved correctly.
Security check missing
Check the reCAPTCHA key pair and the domain enabled with the provider.
Price request is rejected
Check the available wallet credit and then try the request again.
Document not visible
Check in the settings under “General” whether the public document display is enabled.
Property missing on the map
Check that street, postcode and town are complete. After an address change it can take a few minutes for the pin to appear.
Property does not reach the portal
Open the property's “Export” tab: the check shows missing required details. Also check the status and log of the last run at the export target.
MLS search shows no listings
Test the connection under “Settings → MLS/IDX”. Check the token, dataset and whether the connection is active.
Workflow actions are missing in the workflow builder
Update the app in the sub-account or reinstall it. Afterwards “Property search”, “Import MLS listing”, “Market report” and “Open houses” are available among the actions.
Areas shown in the wrong unit
Check the market under “Settings → General” and the area unit in the property's “Master data” tab. The app converts between units; if the property's own unit is wrong, correct it in the source or in the master data.